I. Introduction
A. Brief overview of cast net fishing
Cast net fishing is an ancient technique that has been practiced for centuries by anglers across the globe. This method involves using a circular net, weighted around its edges, to trap fish in shallow waters. The net is thrown over a targeted area, and as it sinks, it forms a wide circle, capturing the fish within its perimeter. Once the net has settled, it is retrieved, bringing in the catch. This versatile fishing method is popular for catching baitfish, small fish species, and even shrimp.
B. Importance of proper throwing technique for success
The effectiveness of cast net fishing largely depends on the skill of the angler in throwing the net. A well-executed throw results in a wide, even spread of the net, increasing the chances of a successful catch. On the other hand, a poor throw may lead to the net not opening fully, tangling, or missing the target area altogether. Therefore, learning and mastering the proper throwing technique is crucial for success in cast net fishing.
C. Objective of the guide: teach readers to throw a cast net effectively
This guide aims to teach readers how to throw a cast net effectively, covering essential aspects such as choosing the right cast net, preparing the net, mastering various throwing techniques, and troubleshooting common issues. By following the steps outlined in this guide, both beginners and experienced cast net users will be able to refine their throwing skills and significantly improve their success rate in cast net fishing.
II. Choosing the Right Cast Net
A. Factors to consider
Material:
The material of a cast net plays a crucial role in its performance and durability. Most cast nets are made from monofilament or multifilament nylon, but there are also options made from polyester or braided materials. Monofilament nets are lighter, more transparent, and generally more popular due to their affordability. Multifilament nets, on the other hand, are more durable and less prone to tearing but can be slightly more expensive.

Size:
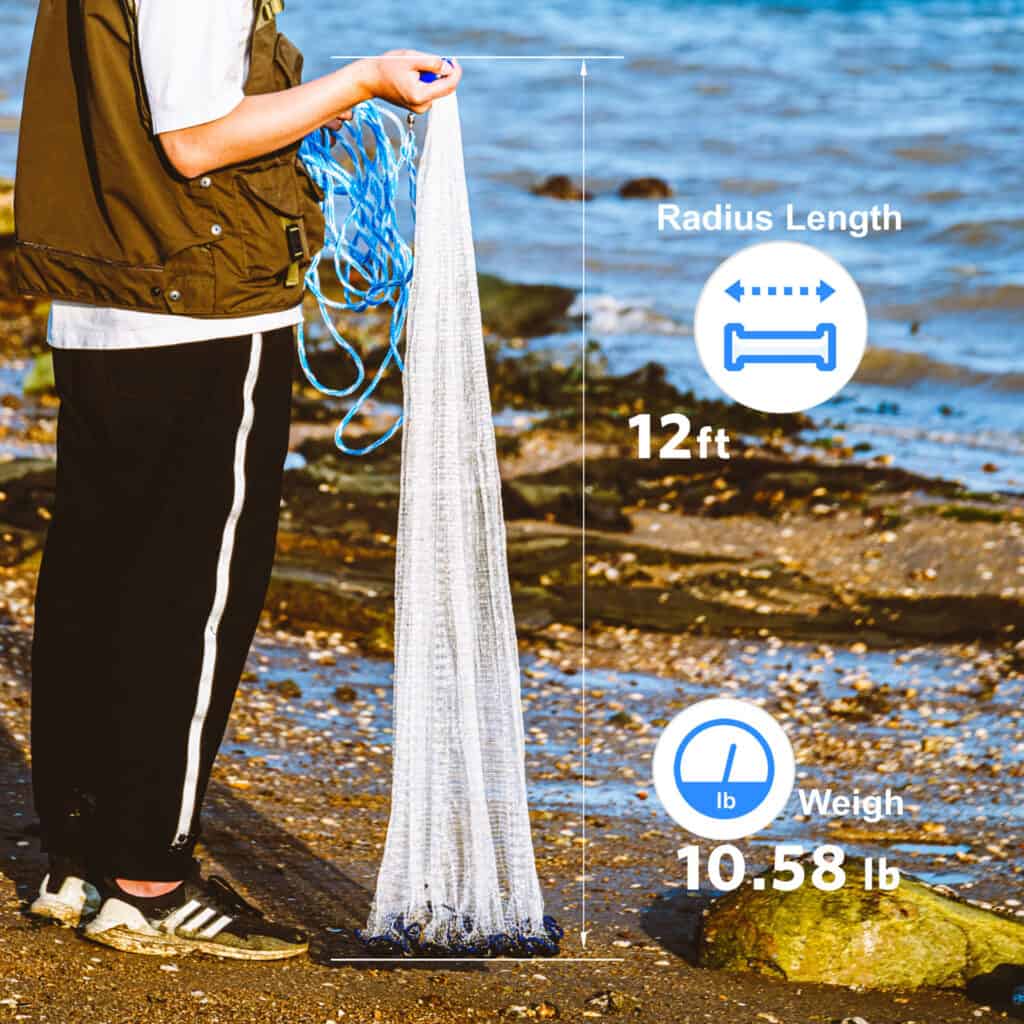
The size of a cast net is determined by its radius, with common sizes ranging from 3 to 12 feet or more. The size you choose depends on the depth of the water you’ll be fishing in and the type of fish you’re targeting. Smaller nets are easier to throw and are suitable for shallow waters, while larger nets cover a greater area and work well in deeper waters. Keep in mind that larger nets can be more challenging to handle, especially for beginners.
Mesh Size:
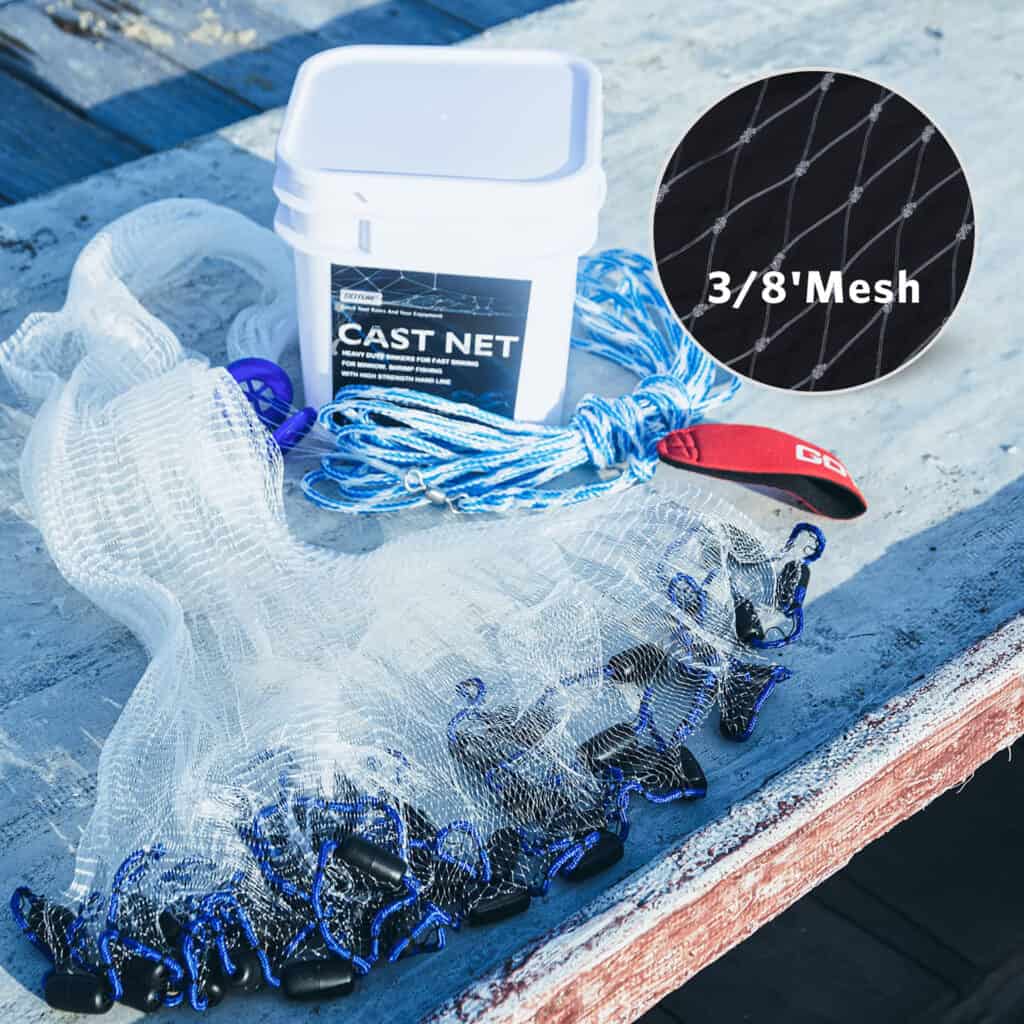
Mesh size refers to the size of the openings in the net, which determines the size of the fish it can catch. Smaller mesh sizes (1/4 inch to 3/8 inch) are suitable for catching small baitfish, while larger mesh sizes (1/2 inch to 1 inch) work better for larger fish or shrimp. Choose a mesh size based on the target species and local regulations, as some areas may have restrictions on mesh sizes allowed for certain species.
B. Types of cast nets
Drawstring cast nets:
Drawstring cast nets feature a drawstring mechanism that helps to close the net around the catch, making it easier to retrieve and ensuring fewer fish escape. This type of net is versatile and suitable for a variety of fishing situations. The drawstring is typically made of durable rope or cord, which is threaded through the lead line or attached to it at intervals.
Bottom pocket cast nets:
Bottom pocket cast nets are designed with a special pocket along the bottom edge of the net, which helps to trap and secure the catch more effectively. As the net sinks, the pocket fills with water, creating a barrier that prevents fish from escaping. This design is particularly useful for catching fish that are quick to swim out of a standard cast net, such as shrimp or other fast-moving species. However, bottom pocket cast nets can be more difficult to throw and may require additional practice to master.
III. Preparing the Cast Net
A. Inspecting the net for damage or tangles
Before you begin using your cast net, it’s important to inspect it for any damage or tangles. Carefully check the netting for holes, frayed mesh, or broken strands that may need repair. Also, look for any tangles in the net or the retrieval line, as these can hinder the net’s performance and make it difficult to throw. If you find any tangles, gently work them out to ensure the net is ready for use.
B. Coiling the retrieval line
After inspecting your cast net, the next step is to coil the retrieval line. Start by finding the end of the line with the hand loop, and hold it in your dominant hand. Then, use your other hand to gather the line into loops, coiling it neatly in your dominant hand. Be sure to keep the coils roughly the same size and avoid twisting the line, as this can cause tangles during the throw.
C. Properly holding the net
Wrist strap:
Put the wrist strap (if available) around your dominant hand’s wrist. This strap helps secure the retrieval line and provides additional support during the throw.
Hand placement:
With the retrieval line coiled in your dominant hand, grasp the horn (the central plastic or metal ring that connects the net to the retrieval line) with the same hand. Make sure your grip is firm but relaxed, allowing for smooth control during the throw.
Gathering the lead line:
Starting at the horn, gather the net in your dominant hand by grabbing a section of the lead line (the weighted edge of the net) and bringing it up to the horn. Continue gathering sections of the lead line in a clockwise or counterclockwise direction, depending on your preference, until you have collected half of the net. Hold the gathered lead line in your non-dominant hand, while your dominant hand continues to hold the horn and coiled retrieval line. This two-handed grip will give you better control and balance during the throw.
IV. Throwing Techniques
A. The basic throw
Foot placement:
Stand with your feet shoulder-width apart, facing the target area. Position your dominant foot slightly behind your non-dominant foot to create a stable base and maintain balance during the throw.
Rotating the body:
As you prepare to throw, rotate your upper body slightly away from the target area while keeping your feet planted. This rotation will help generate momentum and power during the throw.
Releasing the net:
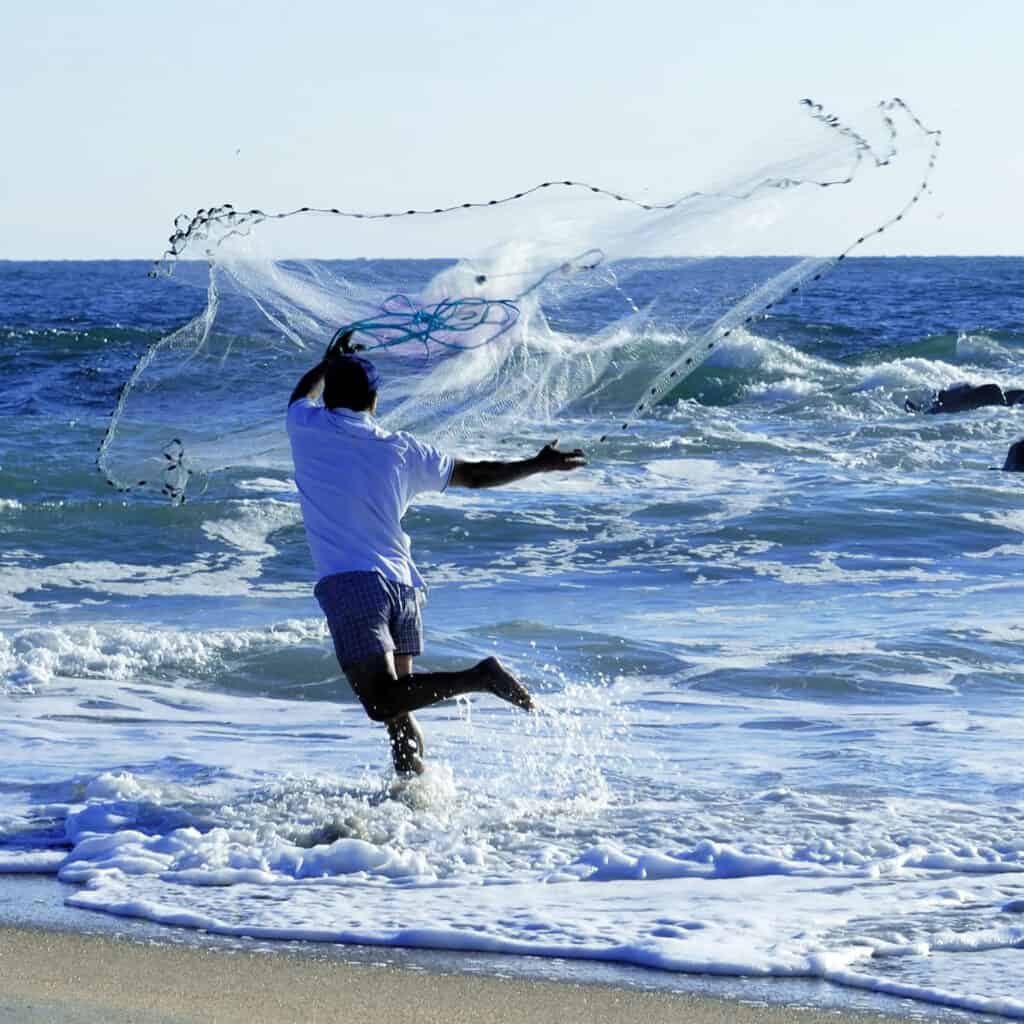
Begin the throw by swinging your dominant arm forward while simultaneously rotating your upper body towards the target area. As you release the net, let go of the lead line from your non-dominant hand first, followed by the horn and coiled retrieval line from your dominant hand. The net should open up into a circular shape as it flies through the air, and it will sink once it hits the water.
B. The triple-load method
Loading the net in thirds:
After gathering the lead line in your non-dominant hand, divide the net into three equal sections. Hold the first section in your non-dominant hand, and use your dominant hand to gather the second section. Then, grab the third section with your dominant hand, positioning it slightly higher than the second section.
Throwing technique:
Execute the throw by swinging both arms forward and releasing the net in a smooth, fluid motion. Release the sections of the net in the following order: third section (highest), second section (middle), and first section (lowest). This method helps create a more even spread of the net and improves the chances of a successful catch.
C. The pancake throw
Spreading the net evenly:
To achieve a pancake throw, it’s essential to spread the net evenly in your hands before throwing. Start by gathering the lead line, as you would for the basic throw, and then use your non-dominant hand to evenly distribute the net between your hands. Make sure the net is not twisted or bunched up, as this can prevent the net from opening fully.
Achieving a flat, circular spread:
The pancake throw aims to create a flat, circular spread of the net on the water’s surface. Begin the throw with a strong rotation of your upper body, similar to the basic throw. As you release the net, focus on a smooth, even release of the lead line and horn to maximize the net’s spread. With practice, the pancake throw can result in a near-perfect circle, increasing your chances of a successful catch.
V. Tips for Improving Your Throw
A. Practicing on land before trying on water
One of the best ways to improve your cast net throwing technique is to practice on land before attempting it on the water. Find an open, flat area where you can safely practice your throw without risking damage to the net or causing injury. Practicing on land allows you to refine your technique and build muscle memory, making it easier to execute a successful throw when you’re out on the water.
B. Visualizing the throw before executing
Before you make a throw, take a moment to visualize the entire process in your mind. Imagine the correct foot placement, body rotation, and the smooth release of the net. By visualizing the throw, you can mentally prepare yourself for the actual action, helping to improve your technique and increase your chances of a successful cast.
C. Adjusting for wind and current conditions
Wind and water currents can significantly impact the performance of your cast net. When throwing in windy conditions, try to position yourself so the wind is at your back, as this will help carry the net further and improve its spread. In areas with strong currents, consider casting your net upstream or upwind to account for the drift. By adjusting your throw for these environmental factors, you can improve your accuracy and overall success.
D. Focusing on a consistent release point
Consistency is key when it comes to mastering the cast net throw. One way to improve consistency is by focusing on a specific release point for each throw. Choose a point in front of you, ideally at eye level, and aim to release the net at that point every time you throw. By maintaining a consistent release point, you can develop a more accurate and effective throwing technique over time.
VI. Retrieving the Cast Net
A. Timing the retrieval
Once you’ve successfully thrown the cast net, it’s important to wait for the right moment to retrieve it. Allow the net to sink completely, ensuring it reaches the bottom or the depth where the fish are located. Keep an eye on the retrieval line; when it stops moving, it’s an indication that the net has settled and you can begin the retrieval process.
B. Pulling in the net
Start pulling in the retrieval line using a hand-over-hand motion, making sure to maintain a steady pace. As you draw the net closer, it will begin to close around the catch, trapping the fish inside. Be cautious not to pull the net in too quickly, as this could cause the net to tangle or the fish to escape.
C. Handling the catch
Once the net is close to the surface, carefully lift it out of the water, taking care not to spill the catch. Hold the net above the water for a few moments to allow any excess water to drain. Then, lower the net into a suitable container, such as a bucket or cooler, and open it to release the catch. Be gentle when handling the net and the fish to minimize stress and potential injury.
D. Properly folding and storing the net for next use
After emptying the catch, inspect the net for any damage or tangles that may need attention. Untangle the net if necessary and lay it flat on a clean surface. Begin folding the net by coiling the retrieval line, then gathering the lead line, and finally folding the net itself into a neat, compact bundle. Store the folded net in a cool, dry place away from direct sunlight to ensure its longevity and to prevent any potential damage caused by moisture or UV exposure.
VII. Troubleshooting Common Throwing Issues
A. Incomplete net spread
If your cast net is not spreading completely during the throw, it may be due to several factors. First, ensure that you are holding the net correctly and that it is not twisted or tangled. Second, practice your throwing technique, focusing on a smooth release and consistent release point. If the issue persists, consider trying a different throwing method, such as the triple-load or pancake throw, to achieve a better spread.
B. Tangling during the throw
Tangling can occur if the net or retrieval line becomes twisted or knotted before the throw. To prevent tangling, inspect the net and retrieval line before each throw, and remove any tangles or knots. Also, ensure that you are coiling the retrieval line properly and evenly distributing the net between your hands during the gathering process. Practicing your throw on land can also help you identify and address any issues that may lead to tangling.
C. Nets sinking too slowly
If your cast net sinks too slowly, it may allow fish to escape before the net reaches the appropriate depth. This issue can be caused by a net that is too light for the fishing conditions or an incorrect throwing technique. To address this issue, consider using a net with heavier weights or a smaller mesh size, which can help the net sink more quickly. Additionally, work on refining your throwing technique to ensure a more efficient and accurate cast.
VIII. Conclusion
A. Recap of the importance of proper throwing technique
Mastering the art of cast net fishing requires patience, practice, and a strong understanding of proper throwing techniques. A well-executed throw not only increases your chances of a successful catch but also helps to protect your net from damage and prolong its lifespan.
B. Encouragement to practice and refine skills
As with any skill, practice is key when it comes to improving your cast net throwing abilities. Dedicate time to practice on land before attempting to throw in real fishing conditions. As you refine your technique and become more confident, you’ll find that your success rate increases and the overall fishing experience becomes more enjoyable.
C. Invitation to share experiences and tips with fellow cast net enthusiasts
Cast net fishing is a rewarding and engaging activity that connects people with a shared passion for the sport. Don’t hesitate to share your experiences, tips, and insights with fellow cast net enthusiasts, whether it’s through online forums, social media, or in-person gatherings. By sharing knowledge and supporting one another, the cast net community can grow and thrive, ensuring that this timeless fishing technique continues to be enjoyed by future generations.
